Pages

Friday, 26 May 2017

OVEN POACHED EGGS !!

A dear friend of mine, posted a video (from Foodstyle.com)about
poaching eggs in the oven and I was quite intrigued. Not only can poaching eggs, in the traditional method, be a disaster be challenging but you can only make 2-3 at a time!!

Here is what I found:

The video said to put about a tablespoon of water in each cup of a regular muffin pan, then crack an egg over the water and bake at 350� for 8 to 10 minutes.........well, that ALMOST worked.

I DID use the scant tablespoon of water, and I DID preheat my electric oven to 350�, but when I tried it using a standard cupcake (muffin) pan, the egg + water filled it to overflowing and took a full 20 minutes to cook, not 8 to 10.

On my second attempt, I had excellent luck using a jumbo size muffin pan (I think they call them Texas size?) and I gave it a light mist of vegetable spray, then put in the scant tablespoon of water and a large egg. I baked them at 350� for exactly 12 minutes (not 8 to 10)
and they lifted right out of the pan with a spoon.....YUM!!!


  A PERFECTLY POACHED EGG !!
Whether you are making one or 30, this method (with my tweaks) really does work and it couldn't be easier!!
The difference in cooking time (between my oven and the Foodstyle video) COULD be that their oven simply runs hotter than mine or maybe they were using smaller eggs (?)With so many variables, I suggest you do a "test egg" to see how long it takes in your oven before you make a whole pan of these.
One other note: When your eggs are done to your liking, take them OUT OF THE PAN right away or they will continue to cook.
Don't you just want to
dunk your toast in this one?

ENJOY !!!

?

Thursday, 27 April 2017

VELVEETA RISOTTO

I had to smile when I named this recipe because never have two little words described opposite ends of the comfort food spectrum more devishly, just rest assured, that if you like good old mac and cheese, made with Velveeta (like ALL good mac and cheeses ??) you will love this saucy side dish !!

Arborio rice (for those of you who have not cooked it before)is a short chubby grain of rice, that (when cooked correctly) gets bigger and creamier as it cooks(without getting mushy). The cooking process is also different than regular white rice, since you add the HOT liquid 1/2 cup at a time, letting the rice cook (and liquid reduce) before you add the next 1/2 cup of liquid. Sounds complicated, but it isn't.


BACON RISOTTO and CHEESE

4 cups chicken stock
1 cup ARBORIO rice  (not regular rice)
2 tablespoons butter
1/4 teaspoon garlic powder (not salt)
1/4 teaspoon black pepper
NO SALT (because Velveeta is salty)
5 slices crisp cooked bacon (cut into small pieces)
4 ounces Velveeta cheese cut into small cubes
1 tablespoon thinly sliced green onions


Heat the chicken stock until it almost boils, then keep it hot on a side burner for now.

Melt the butter in a large saucepan, then add 1 cup Arborio rice + the garlic powder and black pepper, and stir. Cook/fry the rice until you see very pale golden edges on most of the rice ....... then add your first half cup of HOT chicken stock and stir. 

Bring to a VERY GENTLE boil(NO lid) until the liquid is mostly absorbed, then add another half cup of HOT chicken stock and stir. 


Repeat this process (1/2 cup of broth at a time)and start testing the rice for "done-ness" at about 15 minutes (but expect the whole process to take more like 20 minutes).  

When you add the LAST half cup of HOT chicken stock, include the small cheese cubes + bacon and green onions. Gently stir, then let it sit a minute while the cheese melts and stir gently again.  Serve !!


CLICK ON THIS PHOTO,
THEN TAKE A BITE !!!


Sunday, 23 April 2017

CROCK-POT CHICKEN SPAGHETTI

This is a quick and easy weekend recipe for chicken spaghetti and everyone loves it. I usually make this with chicken breasts,  but it is also excellent if you substitute quartered chicken thighs and throw in some mushrooms....add a tossed salad and dinners ready.


2 large boneless skinless chicken breasts (or several thighs)
1/2 cup dry bread crumbs
1/4 cup grated Parmesan cheese
1 egg beaten
1 jar meatless marinara sauce (about 25 ounces)
1/2 cup water
1/2 cup chopped onions
2 tablespoons butter
2 teaspoons basil
1 teaspoon oregano
1/2 teaspoon garlic powder
1 teaspoon sugar
1/2 teaspoon salt
1/4 teaspoon black pepper
1/8 teaspoon cayenne

mushrooms (optional)
Mozzarella cheese
spaghetti noodles

In small saucepan, melt 2 tablespoons butter and add 1/2 cup chopped onions. Saute onions at medium high heat until you start to get golden edges on the onions (the onions AND butter they cooked in, go into the sauce).

Spray the inside of your slow cooker with vegetable spray before you put in the marinara sauce + water + well sauteed onions and butter + basil + oregano + garlic powder +  sugar + salt + black pepper + cayenne pepper + melted butter (and mushrooms if you are using them). Stir well.

Mix the bread crumbs and Parmesan cheese in one bowl and the beaten egg in another bowl. Coat the chicken in beaten egg, then roll it in the bread crumb-Parmesan mixture. Place the pieces gently (in a single layer) in the marinara mixture and spoon a LITTLE of the sauce over the chicken, but DON'T MIX AFTER YOU PUT THE CHICKEN IN THE SAUCE OR IT WILL KNOCK OFF THE COATING.

Set your slow cooker on LOW for 3 to 4 hours and do not disturb the chicken while it cooks. 

About 30 minutes before it's time to eat, GENTLY lift out the chicken and set it aside, then stir in about 1/2 pound of half cooked spaghetti noodles (that have been tossed with a little butter) into the crockpot (they will finish cooking in the sauce). Make sure the noodles are well coated, BEFORE GENTLY placing the cooked chicken back on top of the noodles (don't stir)and top each piece of chicken with a some mozzarella cheese. Put the lid back on and let it cook on LOW for 20-30 minutes or till cheese is well melted, DON'T STIR.

NOTE: All crock-pots cook at different temperatures, so keep that in mind when you set your timer. I usually cook 2 chicken breasts for about 3 1/2 hours (almost fall-apart tender). Just keep an eye on the chicken the first time you try this recipe, so it doesn't get over cooked.

NOTE: Chicken thighs cut into larger cubes works VERY well in this recipe too.


NOTE: Use whatever commercial marinara sauce you like. Personally, I use an inexpensive brand (like Ragu) because the extra onion, oregano, basil, garlic, sugar, salt and pepper jazz up the marinara nicely.

NOTE: This would be a fantastic recipe for a potluck dinner if you quarter the chicken breasts or use thighs.


ENJOY !!!

Wednesday, 29 March 2017

PECAN PIE BITES

 
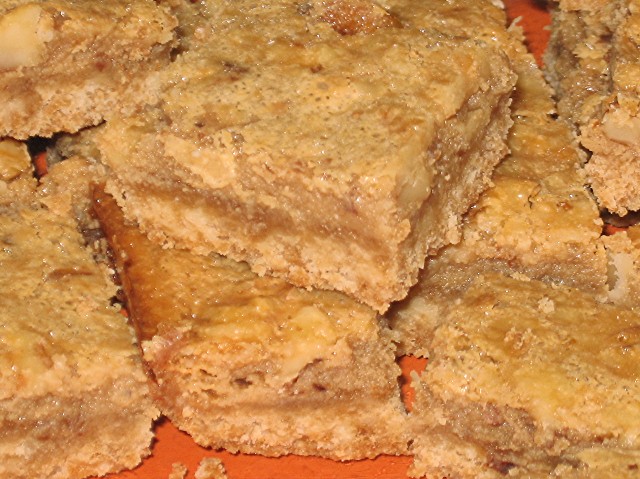
Picky-picky Hubby tells me these Pecan Pie Bites are totally addicting. They have a buttery shortbread crust ......  a slightly gooey center and glazed sweet pecans on top. What more can you ask for?  Oh yes, they also freeze exceptionally well!!!

Click on this photo to get a better look?

CRUST
2 cups all purpose flour
1/3 cup sugar
2/3 cup butter (room temperature)

Mix the above crust ingredients well and press into a  9" x 13" baking dish that has been lined with parchment or no-stick foil (see note below). This mixture will seem crumbly before you bake it, but don't worry about that. Just pat it evenly into the pan and bake in preheated 350� oven for 20 minutes. If you are using a glass baking pan, bake at 325�.

While the crust is baking, mix up the topping:

TOPPING
3 eggs well beaten
1 cup light corn syrup (I use Karo brand)
1/2 cup granulated sugar
1/2 cup brown sugar
2 tablespoons melted butter
1 teaspoon vanilla
1 + 2/3 cup chopped pecans

Mix well and pour over partially baked crust, making sure the nuts are evenly spread out. Return to the oven and bake for 25 more minutes.

 
Cool COMPLETELY in pan.


NOTE:  The Pecan Pie Bite crust does not stick to the pan, but around the edges of the topping, it does like to stick. To combat that, I line my 9" x 13" baking pan with parchment paper or the new Reynolds Easy Release foil, leaving the ends a little long so I can use them as "handles" to lift out the COMPLETELY COOLED recipe. 

Make sure they have cooled this 
to room temperature before
you cut them into bites. 

NOTE:  Since we are empty-nesters, this recipe is too big for us, so I cut the baked recipe into thirds and wrap each one in plastic wrap then again in a zip top freezer bag and freeze them.They freeze VERY well. 

DO NOT CUT THEM INTO "BITES" UNTIL YOU  THAW THEM OUT.


ENJOY !!!?

Wednesday, 22 March 2017

CLASSIC SHORTBREAD COOKIES

Sweet and tender, these old fashioned classic shortbread cookies are easy to make and ALWAYS a big hit. Picky-picky husband loves them frosted in pink (for some weird reason), they are one of his all time favorites.


CLASSIC SHORTBREAD COOKIES

2 cups UNsalted butter (room temperature)
1 cup granulated sugar
1/2 teaspoon table salt
2 teaspoons vanilla extract
1 teaspoon coconut extract
4 cups all purpose flour
(NO EGGS)

The cookie batter in the recipe is fairly heavy, so it works best in a stand mixer if possible.

Add 2 cups (one pound) of room temperature butter and 1 cup regular sugar into the bowl of your stand mixer. Beat until fluffy (about 2 minutes). The last 30 seconds or so, add the salt and extracts and beat until well mixed. (see note about salt)

Add the flour, 1 cup at a time, mixing well between each addition.
Dump cookie batter onto counter and divide into 4 sections. Roll each section into a "log" about 2" in diameter. Wrap each "log" in plastic wrap and chill for one hour. You can roll the entire CHILLED log in sprinkles or finely chopped nuts before you slice them if you like.


Pre-heat oven to 350� and slice chilled cookie dough "logs" into 1/4" slices. Place on UNgreased cookie sheet and bake for 18 minutes or until the very edges just start to turn golden.

Cool cookies and frost if you like.  If you aren't going to frost them, roll the sliced cookie's in granulated sugar BEFORE BAKING.

NOTE: If you do not have UNsalted butter on hand (no big deal), just use regular salted  butter, but LEAVE OUT the salt in the recipe.


ENJOY !!!!!

Tuesday, 21 February 2017

STRAWBERRY TEA CAKE (KNOWN IN MY HOUSE AS THE BEST COFFEE CAKE IN 10 YEARS!) (Seriously!)

Usually, when I hear the word "coffee cake" I think of a sweet treat that is only "at it's best" right out of the oven and it usually needs either a cup of coffee, tea or glass of milk to wash it down. Well, dear friends, this coffee cake IS the exception to that rule. My husband and I finished this cake in a single day with NO trouble (a cake this size usually lasts us several days). We just couldn't stop snacking on it!


I used all strawberries, this time, which added to the sweetness of this buttery cake, but we seriously enjoy this recipe with a raspberry filling as well.I sure hope you give it a try, you will NOT be disappointed.

Make the fruit filling first and let it cool a little.

In a heavy bottomed sauce pan, mix:

12 ounces of frozen strawberries (I used 12 ounces of frozen strawberries that I chopped finely in my food processor).
1/3 cup granulated sugar
1 tablespoon cornstarch

Heat the above ingredients, over medium heat, stirring until it is thick and bubbling. Set aside while you make the batter.

Cake Batter
2 and 1/4 cups all purpose flour
3/4 cup white sugar
3/4 cup COLD butter sliced in to thin pats

Put the flour, sugar and butter in your food processor and pulse until you get fine crumbs. Remove 1/2 cup of these fine crumbs and set them aside for later in the recipe.

NEXT:
To the remaining crumbs in the food processor, add:
1/2 teaspoon baking powder
1/2 teaspoon baking soda
1/8 teaspoon salt
1 egg
3/4 cup buttermilk (no substitutions)
1 teaspoon vanilla extract

Pulse a few times until everything is good and moist (but don't over-mix).

Preheat your oven to 350 and grease and flour a (2 piece) 10" round tart pan. Using your fingers, press 2/3 of the batter into the prepared tart pan, pushing the batter evenly across the bottom and one inch up the sides of the pan (flouring your finger tips helps here).

Once you have the batter spread out and pushed up on the edges, gently pour in the fruit filling and spread it around the bottom.

With the reserved 1/3 of the batter, place small pieces in an irregular pattern on top of the fruit (I used a one teaspoon measure to get the right size). Be very careful not to push the batter pieces down into the fruit, you want them to float on top of it as much as possible. Finally, sprinkle the reserved crumbs over everything.

Bake in a 350 oven (Important tip; place a cookie sheet under the tart pan) for 30 to 35 minutes (my electric oven takes 35 minutes). 

The finished cake will be golden brown and smell heavenly!! I am certain that just about any fruit would work with this coffee cake.

When the cake is done baking, place it on a cooling rack for 15 minutes before you take it out of the pan.

 
ENJOY !!!

Saturday, 18 February 2017

FREEZING EXTRA BUTTERMILK

 
OUT OF BUTTERMILK FOR BISCUITS ???


How many times have you tried a recipe that calls for 1 cup of buttermilk but they only sell it in quarts? Usually (at my house anyway) the unused/extra buttermilk sits (forgotten) in the back of the fridge until its "use by" date has expired, but that is now a thing of the past. Since I discovered how well buttermilk freezes, I always have it in the house.

The only trick is to freeze it in small containers so that it thaws quickly. The smallest container I tried was my ice cube tray. After they are frozen, just put them in a freezer bag and carefully mark what's in the bag:


Ice cube trays are not a standard size. I have one that measures 2 tablespoons per cube and one that measures 1� tablespoons per cube, so keep that in mind when you are thawing out the cubes (I usually just thaw a couple extra to be on the safe side).

As a general rule:

8 frozen 2 oz. cubes = 1 cup buttermilk
6 frozen  2 oz. cubes = 3/4 cup buttermilk
4 frozen 2 oz. cubes = 1/2 cup buttermilk
2 frozen 2 oz. cubes = 1/4 cup  buttermilk
6 frozen 2 oz. cubes  = 3/4  cup buttermilk?


You can thaw the buttermilk cubes overnight in the fridge, or if you need them sooner than that, you can microwave them for just a few seconds.
 
DON'T FREAK OUT TIP:
Sometimes, the thawed out buttermilk looks like it's separated (not pretty), don't freak out. Just whisk it back together (for a few seconds) then use it in any recipe.

TIP # 2:
The accuracy of the SIZE of your frozen buttermilk cubes is just a guideline and not at all important, it just gives you an idea of how many to thaw out for any given recipe.
?

?

Thursday, 22 December 2016

EASY KOLACHE COOKIES

There are many different styles (and spellings) for Kolache cookies; some are made with yeast, some made with cream cheese, some are round, some are rolled up.

This recipe is a cream cheese and butter crust that is light as air and bakes up flaky and sweet. Instead of using dried fruit, it uses jam (any flavor you like) They are truly delicious and look SO PRETTY on any cookie tray.

CRUST

2  1/4  cups all purpose flour
1  cup UNsalted butter at room temperature
8  ounces full fat cream cheese at room temperature
1/2 teaspoon salt

Mix flour and salt and set aside. NOTE: If you do not have salt free butter, just omit the salt in this recipe.

In a stand mixer, beat the room temperature butter and the room temperature cream cheese on medium high speed for 4 minutes.

After you have beaten the butter-cream cheese for 4 minutes, slowly add the flour-salt  mixture (I usually add it in fourths), mixing well after each addition.

Divide the dough in half and shape into two flat disks about 3/4" thick. Cover and chill for about an hour.

After the dough has chilled for an hour, lightly coat each disk with flour and pat off any extra. Coat your counter with regular granulated sugar and roll out the dough to 1/8" thickness.

NOTE: If you are like me, I often don't get back to this dough within an hour and it is rock hard when I go to roll it out. If that happens, just let it sit out for 10 to 15 minutes to let it soften up enough to be workable. The dough is very forgiving that way.


Cut dough into 2 1/2 inch squares. Pick up each square and pinch two opposite corners together (see above photo). Lay it on a parchment lined baking sheet and spoon 1/4 teaspoon of favorite jam into each end of the cookie. Personally, I like to do this step with a disposable frosting bag and I just squirt it into each end opening.

Sprinkle the pinched center with a little more granulated sugar. Bake in preheated 375� oven for 12 to 14 minutes (my electric oven takes exactly 12 minutes). Cool on wire rack.


ENJOY !!

Friday, 9 December 2016

BETTER THAN MOM's PECAN TASSIES

Everyone seems to have their own favorite Pecan Tassie recipe, but the crust in 99% of the recipes out there is the same..... flour, butter and cream cheese.

This year, I added just a little extra something to the crust part of the recipe and it made a HUGE difference to the overall cookie, they were a big hit.

Tassie Crust
1 cup butter (room temperature)
6 ounces cream cheese (room temperature)
2 cups flour
2 tablespoons sugar
1 1/2 teaspoons vanilla extract
1/4 teaspoon salt

Cream the butter and cream cheese (with electric mixer) until it is light and fluffy. Add rest of the ingredients and beat until the dough comes cleanly away from the inside walls of your mixing bowl. Flatten dough into a disk, wrap in plastic and chill for one hour.


Tassie Filling
3 large eggs3 tablespoons melted unsalted butter
1 3/4 cups light brown sugar
1 teaspoon vanilla
1/4 teaspoon salt
1 cup coarsely chopped pecans

Beat the eggs until very well mixed and lemon colored. Stir in everything else.


ASSEMBLYRoll pastry into 1 inch balls and place them into an ungreased mini-muffin pan. Using your fingers, press the balls of dough into the bottom of each cup and up the sides. (I use the floured end of my rolling pin to press the dough into place instead of my fingers). Put a few chopped pecans in the bottom of each pastry shell and top with about a tablespoon of filling. (see note)

Bake in pre-heated 375F oven for 15-20 minutes or until the pastry is golden and the filling is set, yet still a little soft in the center. Remove from oven and sit the pan on a wire rack for about 10 minutes before you try to lift them out. Lift tassies out of pan and cool on a wire rack.

NOTE: Keep in mind that the filling puffs a little as it bakes, so don't overfill the unbaked shells. If you overfill them, they will be harder to get out. For those stubborn Tassies that want to stick, just use the tip of a knife to help you lift them out of the pan.

Monday, 10 October 2016

EASY NO KNEAD ENGLISH MUFFINS

This recipe is SO easy that it would make a great weekend cooking project for that kid in the family that is a "wanna-be" chef. There are several steps, but they are all EASY.


You will need:
2 cups all purpose flour (divided)
1 tablespoon sugar
1 tablespoon vegetable oil
1 1/3 cup milk 
2 teaspoons KOSHER salt(kosher measures different than table salt)
1 envelope of yeast
yellow corn meal
6  large mason jar rings

In a large bowl, mix:

1 cup all purpose flour (you'll use other cup later)
1 tablespoon sugar
2 teaspoons kosher salt (not regular salt)
1 envelope yeast (I buy it in bulk, so I use 1 tablespoon)

In a smaller, microwave safe bowl, mix:

1 1/3 cups milk
1 tablespoon vegetable oil

Microwave the milk-oil for 1 minute. Take it out of the microwave and stir it, then test it with your finger. It should feel nice and warm, but  NOT hot (I call it baby bottle warm).

Stir the milk-oil into the dry  mixture, until everything is very well mixed, then add ONE MORE cup of flour and stir until WELL mixed. Cover the bowl and set it in a warm part of your kitchen for 45 minutes.  After 45 minutes, it will look puffy like this:


Stir the air out of the dough (it will be very sticky). 

Preheat your dry (no grease) electric fry pan to 250�. Now here is a hint: everyone's fry pans cook at different rates, so cook ONE "test muffin" to see if you need to turn your heat up a little or down  a little. You want the muffin to look nice and golden when you flip it over after 5 minutes, like this:

 My electric fry pan is perfect at 250�.

Now you are ready to make the rest of the muffins. Spray the inside of the jar rings with vegetable spray (these are going to be your English muffin molds). Set them on your PRE-HEATED dry electric fry pan and sprinkle a little corn meal in the circle before you put the dough in.

Spoon batter into ring molds (it's pretty thick and sticky at this stage). I used about 1 1/4 large ice cream scoops of dough for each muffin.

When all 6 rings have dough in in them, put a lid on the fry pan, but cock it sideways so that it doesn't cover the whole pan. If your fry pan doesn't have a lid, you can cover it with a cookie sheet, but make sure the cookie sheet doesn't touch the muffins.

Cook at 250� for five minutes, then (before you flip it over) sprinkle a little corn meal onto the top of the muffin and then GENTLY flip it over (ring and all).

NOTE: It isn't absolutely necessary, but a Teflon pan works great for these muffins.


Put the lid back on the pan (leaving it open a little) and cook for another five minutes.  Remove from rings (they slide right out) and put the muffin on a baking rack to cool.


Cool completely, then split them open with a fork. To do this, insert the fork into the side of the muffin, half way between top and bottom. Twist the fork JUST A LITTLE, then remove it. Repeat this all the way around the muffin. When you get back to the place where you started, the muffin should just come apart.  Just make sure you do this AFTER the muffin is completely cooled.

To serve, toast in toaster or under broiler until light golden.

If you don't have mason jar lids, you can use anything (that can withstand heat) that is about the same size.


ENJOY !!!