Pages

Wednesday, 29 March 2017

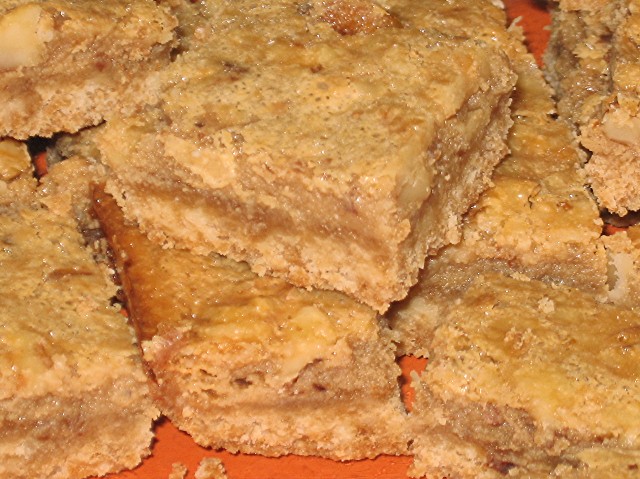
PECAN PIE BITES

 
Picky-picky Hubby tells me these Pecan Pie Bites are totally addicting. They have a buttery shortbread crust ......  a slightly gooey center and glazed sweet pecans on top. What more can you ask for?  Oh yes, they also freeze exceptionally well!!!

Click on this photo to get a better look?

CRUST
2 cups all purpose flour
1/3 cup sugar
2/3 cup butter (room temperature)

Mix the above crust ingredients well and press into a  9" x 13" baking dish that has been lined with parchment or no-stick foil (see note below). This mixture will seem crumbly before you bake it, but don't worry about that. Just pat it evenly into the pan and bake in preheated 350� oven for 20 minutes. If you are using a glass baking pan, bake at 325�.

While the crust is baking, mix up the topping:

TOPPING
3 eggs well beaten
1 cup light corn syrup (I use Karo brand)
1/2 cup granulated sugar
1/2 cup brown sugar
2 tablespoons melted butter
1 teaspoon vanilla
1 + 2/3 cup chopped pecans

Mix well and pour over partially baked crust, making sure the nuts are evenly spread out. Return to the oven and bake for 25 more minutes.

 
Cool COMPLETELY in pan.


NOTE:  The Pecan Pie Bite crust does not stick to the pan, but around the edges of the topping, it does like to stick. To combat that, I line my 9" x 13" baking pan with parchment paper or the new Reynolds Easy Release foil, leaving the ends a little long so I can use them as "handles" to lift out the COMPLETELY COOLED recipe. 

Make sure they have cooled this 
to room temperature before
you cut them into bites. 

NOTE:  Since we are empty-nesters, this recipe is too big for us, so I cut the baked recipe into thirds and wrap each one in plastic wrap then again in a zip top freezer bag and freeze them.They freeze VERY well. 

DO NOT CUT THEM INTO "BITES" UNTIL YOU  THAW THEM OUT.


ENJOY !!!?

Wednesday, 22 March 2017

CLASSIC SHORTBREAD COOKIES

Sweet and tender, these old fashioned classic shortbread cookies are easy to make and ALWAYS a big hit. Picky-picky husband loves them frosted in pink (for some weird reason), they are one of his all time favorites.


CLASSIC SHORTBREAD COOKIES

2 cups UNsalted butter (room temperature)
1 cup granulated sugar
1/2 teaspoon table salt
2 teaspoons vanilla extract
1 teaspoon coconut extract
4 cups all purpose flour
(NO EGGS)

The cookie batter in the recipe is fairly heavy, so it works best in a stand mixer if possible.

Add 2 cups (one pound) of room temperature butter and 1 cup regular sugar into the bowl of your stand mixer. Beat until fluffy (about 2 minutes). The last 30 seconds or so, add the salt and extracts and beat until well mixed. (see note about salt)

Add the flour, 1 cup at a time, mixing well between each addition.
Dump cookie batter onto counter and divide into 4 sections. Roll each section into a "log" about 2" in diameter. Wrap each "log" in plastic wrap and chill for one hour. You can roll the entire CHILLED log in sprinkles or finely chopped nuts before you slice them if you like.


Pre-heat oven to 350� and slice chilled cookie dough "logs" into 1/4" slices. Place on UNgreased cookie sheet and bake for 18 minutes or until the very edges just start to turn golden.

Cool cookies and frost if you like.  If you aren't going to frost them, roll the sliced cookie's in granulated sugar BEFORE BAKING.

NOTE: If you do not have UNsalted butter on hand (no big deal), just use regular salted  butter, but LEAVE OUT the salt in the recipe.


ENJOY !!!!!

Tuesday, 21 February 2017

STRAWBERRY TEA CAKE (KNOWN IN MY HOUSE AS THE BEST COFFEE CAKE IN 10 YEARS!) (Seriously!)

Usually, when I hear the word "coffee cake" I think of a sweet treat that is only "at it's best" right out of the oven and it usually needs either a cup of coffee, tea or glass of milk to wash it down. Well, dear friends, this coffee cake IS the exception to that rule. My husband and I finished this cake in a single day with NO trouble (a cake this size usually lasts us several days). We just couldn't stop snacking on it!


I used all strawberries, this time, which added to the sweetness of this buttery cake, but we seriously enjoy this recipe with a raspberry filling as well.I sure hope you give it a try, you will NOT be disappointed.

Make the fruit filling first and let it cool a little.

In a heavy bottomed sauce pan, mix:

12 ounces of frozen strawberries (I used 12 ounces of frozen strawberries that I chopped finely in my food processor).
1/3 cup granulated sugar
1 tablespoon cornstarch

Heat the above ingredients, over medium heat, stirring until it is thick and bubbling. Set aside while you make the batter.

Cake Batter
2 and 1/4 cups all purpose flour
3/4 cup white sugar
3/4 cup COLD butter sliced in to thin pats

Put the flour, sugar and butter in your food processor and pulse until you get fine crumbs. Remove 1/2 cup of these fine crumbs and set them aside for later in the recipe.

NEXT:
To the remaining crumbs in the food processor, add:
1/2 teaspoon baking powder
1/2 teaspoon baking soda
1/8 teaspoon salt
1 egg
3/4 cup buttermilk (no substitutions)
1 teaspoon vanilla extract

Pulse a few times until everything is good and moist (but don't over-mix).

Preheat your oven to 350 and grease and flour a (2 piece) 10" round tart pan. Using your fingers, press 2/3 of the batter into the prepared tart pan, pushing the batter evenly across the bottom and one inch up the sides of the pan (flouring your finger tips helps here).

Once you have the batter spread out and pushed up on the edges, gently pour in the fruit filling and spread it around the bottom.

With the reserved 1/3 of the batter, place small pieces in an irregular pattern on top of the fruit (I used a one teaspoon measure to get the right size). Be very careful not to push the batter pieces down into the fruit, you want them to float on top of it as much as possible. Finally, sprinkle the reserved crumbs over everything.

Bake in a 350 oven (Important tip; place a cookie sheet under the tart pan) for 30 to 35 minutes (my electric oven takes 35 minutes). 

The finished cake will be golden brown and smell heavenly!! I am certain that just about any fruit would work with this coffee cake.

When the cake is done baking, place it on a cooling rack for 15 minutes before you take it out of the pan.

 
ENJOY !!!

Saturday, 18 February 2017

FREEZING EXTRA BUTTERMILK

 
OUT OF BUTTERMILK FOR BISCUITS ???


How many times have you tried a recipe that calls for 1 cup of buttermilk but they only sell it in quarts? Usually (at my house anyway) the unused/extra buttermilk sits (forgotten) in the back of the fridge until its "use by" date has expired, but that is now a thing of the past. Since I discovered how well buttermilk freezes, I always have it in the house.

The only trick is to freeze it in small containers so that it thaws quickly. The smallest container I tried was my ice cube tray. After they are frozen, just put them in a freezer bag and carefully mark what's in the bag:


Ice cube trays are not a standard size. I have one that measures 2 tablespoons per cube and one that measures 1� tablespoons per cube, so keep that in mind when you are thawing out the cubes (I usually just thaw a couple extra to be on the safe side).

As a general rule:

8 frozen 2 oz. cubes = 1 cup buttermilk
6 frozen  2 oz. cubes = 3/4 cup buttermilk
4 frozen 2 oz. cubes = 1/2 cup buttermilk
2 frozen 2 oz. cubes = 1/4 cup  buttermilk
6 frozen 2 oz. cubes  = 3/4  cup buttermilk?


You can thaw the buttermilk cubes overnight in the fridge, or if you need them sooner than that, you can microwave them for just a few seconds.
 
DON'T FREAK OUT TIP:
Sometimes, the thawed out buttermilk looks like it's separated (not pretty), don't freak out. Just whisk it back together (for a few seconds) then use it in any recipe.

TIP # 2:
The accuracy of the SIZE of your frozen buttermilk cubes is just a guideline and not at all important, it just gives you an idea of how many to thaw out for any given recipe.
?
?

Thursday, 22 December 2016

EASY KOLACHE COOKIES

There are many different styles (and spellings) for Kolache cookies; some are made with yeast, some made with cream cheese, some are round, some are rolled up.

This recipe is a cream cheese and butter crust that is light as air and bakes up flaky and sweet. Instead of using dried fruit, it uses jam (any flavor you like) They are truly delicious and look SO PRETTY on any cookie tray.

CRUST

2  1/4  cups all purpose flour
1  cup UNsalted butter at room temperature
8  ounces full fat cream cheese at room temperature
1/2 teaspoon salt

Mix flour and salt and set aside. NOTE: If you do not have salt free butter, just omit the salt in this recipe.

In a stand mixer, beat the room temperature butter and the room temperature cream cheese on medium high speed for 4 minutes.

After you have beaten the butter-cream cheese for 4 minutes, slowly add the flour-salt  mixture (I usually add it in fourths), mixing well after each addition.

Divide the dough in half and shape into two flat disks about 3/4" thick. Cover and chill for about an hour.

After the dough has chilled for an hour, lightly coat each disk with flour and pat off any extra. Coat your counter with regular granulated sugar and roll out the dough to 1/8" thickness.

NOTE: If you are like me, I often don't get back to this dough within an hour and it is rock hard when I go to roll it out. If that happens, just let it sit out for 10 to 15 minutes to let it soften up enough to be workable. The dough is very forgiving that way.


Cut dough into 2 1/2 inch squares. Pick up each square and pinch two opposite corners together (see above photo). Lay it on a parchment lined baking sheet and spoon 1/4 teaspoon of favorite jam into each end of the cookie. Personally, I like to do this step with a disposable frosting bag and I just squirt it into each end opening.

Sprinkle the pinched center with a little more granulated sugar. Bake in preheated 375� oven for 12 to 14 minutes (my electric oven takes exactly 12 minutes). Cool on wire rack.


ENJOY !!

Friday, 9 December 2016

BETTER THAN MOM's PECAN TASSIES

Everyone seems to have their own favorite Pecan Tassie recipe, but the crust in 99% of the recipes out there is the same..... flour, butter and cream cheese.

This year, I added just a little extra something to the crust part of the recipe and it made a HUGE difference to the overall cookie, they were a big hit.

Tassie Crust
1 cup butter (room temperature)
6 ounces cream cheese (room temperature)
2 cups flour
2 tablespoons sugar
1 1/2 teaspoons vanilla extract
1/4 teaspoon salt

Cream the butter and cream cheese (with electric mixer) until it is light and fluffy. Add rest of the ingredients and beat until the dough comes cleanly away from the inside walls of your mixing bowl. Flatten dough into a disk, wrap in plastic and chill for one hour.


Tassie Filling
3 large eggs3 tablespoons melted unsalted butter
1 3/4 cups light brown sugar
1 teaspoon vanilla
1/4 teaspoon salt
1 cup coarsely chopped pecans

Beat the eggs until very well mixed and lemon colored. Stir in everything else.


ASSEMBLYRoll pastry into 1 inch balls and place them into an ungreased mini-muffin pan. Using your fingers, press the balls of dough into the bottom of each cup and up the sides. (I use the floured end of my rolling pin to press the dough into place instead of my fingers). Put a few chopped pecans in the bottom of each pastry shell and top with about a tablespoon of filling. (see note)

Bake in pre-heated 375F oven for 15-20 minutes or until the pastry is golden and the filling is set, yet still a little soft in the center. Remove from oven and sit the pan on a wire rack for about 10 minutes before you try to lift them out. Lift tassies out of pan and cool on a wire rack.

NOTE: Keep in mind that the filling puffs a little as it bakes, so don't overfill the unbaked shells. If you overfill them, they will be harder to get out. For those stubborn Tassies that want to stick, just use the tip of a knife to help you lift them out of the pan.

Monday, 10 October 2016

EASY NO KNEAD ENGLISH MUFFINS

This recipe is SO easy that it would make a great weekend cooking project for that kid in the family that is a "wanna-be" chef. There are several steps, but they are all EASY.


You will need:
2 cups all purpose flour (divided)
1 tablespoon sugar
1 tablespoon vegetable oil
1 1/3 cup milk 
2 teaspoons KOSHER salt(kosher measures different than table salt)
1 envelope of yeast
yellow corn meal
6  large mason jar rings

In a large bowl, mix:

1 cup all purpose flour (you'll use other cup later)
1 tablespoon sugar
2 teaspoons kosher salt (not regular salt)
1 envelope yeast (I buy it in bulk, so I use 1 tablespoon)

In a smaller, microwave safe bowl, mix:

1 1/3 cups milk
1 tablespoon vegetable oil

Microwave the milk-oil for 1 minute. Take it out of the microwave and stir it, then test it with your finger. It should feel nice and warm, but  NOT hot (I call it baby bottle warm).

Stir the milk-oil into the dry  mixture, until everything is very well mixed, then add ONE MORE cup of flour and stir until WELL mixed. Cover the bowl and set it in a warm part of your kitchen for 45 minutes.  After 45 minutes, it will look puffy like this:


Stir the air out of the dough (it will be very sticky). 

Preheat your dry (no grease) electric fry pan to 250�. Now here is a hint: everyone's fry pans cook at different rates, so cook ONE "test muffin" to see if you need to turn your heat up a little or down  a little. You want the muffin to look nice and golden when you flip it over after 5 minutes, like this:

 My electric fry pan is perfect at 250�.

Now you are ready to make the rest of the muffins. Spray the inside of the jar rings with vegetable spray (these are going to be your English muffin molds). Set them on your PRE-HEATED dry electric fry pan and sprinkle a little corn meal in the circle before you put the dough in.

Spoon batter into ring molds (it's pretty thick and sticky at this stage). I used about 1 1/4 large ice cream scoops of dough for each muffin.

When all 6 rings have dough in in them, put a lid on the fry pan, but cock it sideways so that it doesn't cover the whole pan. If your fry pan doesn't have a lid, you can cover it with a cookie sheet, but make sure the cookie sheet doesn't touch the muffins.

Cook at 250� for five minutes, then (before you flip it over) sprinkle a little corn meal onto the top of the muffin and then GENTLY flip it over (ring and all).

NOTE: It isn't absolutely necessary, but a Teflon pan works great for these muffins.


Put the lid back on the pan (leaving it open a little) and cook for another five minutes.  Remove from rings (they slide right out) and put the muffin on a baking rack to cool.


Cool completely, then split them open with a fork. To do this, insert the fork into the side of the muffin, half way between top and bottom. Twist the fork JUST A LITTLE, then remove it. Repeat this all the way around the muffin. When you get back to the place where you started, the muffin should just come apart.  Just make sure you do this AFTER the muffin is completely cooled.

To serve, toast in toaster or under broiler until light golden.

If you don't have mason jar lids, you can use anything (that can withstand heat) that is about the same size.


ENJOY !!!

Tuesday, 4 October 2016

CHILI and CORNBREAD WAFFLES

This idea came to me years ago when I was trying to think up something "new" for dinner. It is one of those recipes that you can customize any way you like. Lots of fresh avocado? sour cream? fresh tomatoes? lettuce? Whatever "go withs" your heart desires.

Picky-picky husband hates spicy food, so this recipe (using 1/8 teaspoon of cayenne pepper) is quite mild. If you like more "heat" you can add your "heat of choice" during the simmering stage.


CHILI
1 pound lean ground beef
3/4 cup chopped onion
1 clove garlic minced
14 ounce can crushed tomatoes
2 tomato cans of water
6 ounce can tomato paste

3 teaspoons chili powder
1 teaspoon ground cumin
1 1/2 teaspoons salt
1/4 teaspoon black pepper
1/8 to 1/4 teaspoon cayenne pepper (1/8 tsp. good for younger kids)
1 tablespoon sugar
4 ounce can mild green chiles (I use Ortega brand)
2 15 ounce cans red kidney beans
Brown the ground beef and drain off all but a tablespoon or so of fat. Sautee the onions (in the fat) for a few minutes or until they smell sweet. Add the garlic and sautee another minute or so.

Add everything else and stir well. Simmer slowly (without a cover)for about an hour. You can also put it in the Crockpot at this stage and cook on low all afternoon if that suits your schedule better.


NOTE: If you simmer it all afternoon in the Crockpot, make sure you crack the lid open just a little by inserting a spoon just under the edge of the lid. This helps the chili thicken as it simmers.

CORNBREAD WAFFLES
1 cup yellow cornmeal
1/2 cup all purpose flour
1 teaspoon baking powder
1/2 teaspoon baking soda
1/2 teaspoon salt
1 1/2 cups buttermilk
2 tablespoons melted butter
1 egg

Whisk the dry ingredients together in one bowl and the wet ingredients in another bowl. Combine the bowels and stir till well blended.

Preheat your waffle iron and spray it with vegetable spray. Put between 1/2 cup and 3/4 cup of batter in waffle iron and cook it for 4 to 5 minutes on medium heat.

If you like crispy waffles under your chili, you can pop the baked waffles in the oven for a few minutes at about 250� and they will crisp up nicely.

To serve, top the warm waffle with hot chili and then go to town with whatever toppings you like. We like it simple with shredded cheddar and sour cream.

ENJOY !!!?


Friday, 30 September 2016

POTLUCK RIGATONI

This rich, delicious, full flavored Rigatoni will be the first entr�e that people will head for at ANY potluck or gathering. It will feed 5 or 6 people depending on their appetite, so if you are feeding a crowd, double (or triple) the recipe.


1 pound lean ground beef
1 cup onion chopped
1 clove garlic minced
14 ounce can crushed tomatoes
1 14 ounce can water
6 ounce can tomato paste
8 ounce can tomato sauce
1 tablespoon sugar
1/8 teaspoon cayenne pepper (don't leave out)
2 teaspoons dry basil leaves
1/2 teaspoon fennel seeds (don't leave out)
1 teaspoon dry oregano leaves
1 teaspoon Italian seasoning
1 1/2 teaspoons salt
1/4 teaspoon black pepper
1 cup grated Parmesan cheese (not the powdered kind)
1 pound of mozzarella cheese grated
rigatoni noodles (eyeball this amount - about 8 ounces)

Cook the chopped onion in a tablespoon of vegetable oil for about 5 minutes or until it starts to smell a little sweet. Add the garlic and cook/stir for another minute or so.

Stir the ground beef into the onion-garlic and cook until  the meat is no longer pink. After it is cooked, if there is a lot of oil in the pan, make sure you drain the meat well before you add the following.

Add the crushed tomatoes, tomato paste, tomato sauce, water, sugar and spices. Stir well and simmer SLOWLY for an hour and a half (stirring once in a while). After an hour and a half, most of the liquid should have cooked away and it will look like this (not too dry). If it looks overly dry, add a cup of water.


Stir in the Parmesan and Mozzarella (but save a little of the mozzarella to sprinkle over the top before you bake it).
 
Now a word about the noodles: You can use ANY noodle you want, but we really like the hardy (thick walled) rigatoni noodles. Boil them in salted water for 15 minutes. I use half a package of rigatoni noodles in this recipe. If you are using another kind of noodle, just eyeball the amount (and boil according to package directions).


Drain the noodles well and Stir them into the meat and cheese mixture. Top with a little extra mozzarella and bake at 350� for 30-35 minutes or till bubbly.


ENJOY !!!

Sunday, 25 September 2016

ITALIAN SEASONING BLEND

I seldom buy spice blends because I don't use them very much AND you never really know what is in them; some are heavy on garlic, some are heavy on onion and even more of them are heavy on ..."what the heck is that?". When that happens, the $5 jar goes right in the trash, what a waste.  Nowadays, when the occasional recipe calls for Italian seasoning, I just mix up this one, it is excellent.


2  1/4  teaspoons dry basil
2  1/4  teaspoons dry oregano
2  1/4  teaspoons dry parsley
1/4     teaspoon garlic powder (not garlic salt)
1/4     teaspoon onion  powder (not onion salt)
1/4     teaspoon fennel seed
1/4     teaspoon dry thyme
1/4     teaspoon dry rosemary
1/4     teaspoon black pepper
pinch   dry red chili flakes

Basically you just mix all of these ingredients together, however I do an extra step: I measure out the bulky spices, like the fennel seed, rosemary and chili flakes, THEN I work them over a little in my mortar and pestle so it breaks them up which helps distribute their flavor more evenly to the finished spice blend.  This step isn't absolutely necessary, but  it works well.

ENJOY !!!