Pages

Saturday, 13 June 2015

LIPTON ONION SOUP MIX CLONE

We are approaching "party fixin's" season and many of us will be making dips and other recipes that require an envelope of onion soup mix. This recipe tastes JUST LIKE LIPTON ONION SOUP MIX (well, actually it tastes even better because it's such a full flavor).

It's made of pantry staples and it has no soy; it's gluten free; no MSG; you can use low sodium bullion and you can pronounce ALL of the ingredients (not to mention it is very budget friendly).

I am NEVER buying boxed
Lipton Onion Soup mix again!!

 
This clone recipe is GREAT for dips, pot roast, meat loaf, or anything you would normally use the onion soup mix for.
 
4 tablespoons DRY instant minced onion (toasted)
2 tablespoons LOW SODIUM beef bullion granules
1/4 teaspoon onion powder (not onion salt)
1/4 teaspoon DRY parsley flakes
1/8 teaspoon celery seed CRUSHED (important ingredient)
1/8 teaspoon paprika
1/8 teaspoon black pepper
 
Equals a  single 1 1/4 oz.
envelope of soup mix.
 
NOTES: It is not necessary, but I toast the DRY instant minced onion in a hot DRY pan for a few minutes (watch it closely). When it turns golden, remove from the pan immediately or it will continue to get darker. Toast them until they are this color:
 
 ?
NOTES: Make sure you crush the celery seed (and don't leave it out). A mortar and pestle or spice grinder work well for this.


NOTES: If you use the GRANULAR TYPE beef bullion (and you are going to make a sour cream type dip) you'll have to mix everything together and let it sit in the fridge for 20 minutes or so........so the bullion granules can dissolve. After 20 minutes, just stir and the granules will disappear.
 
NOTES: This sounds like a LOT of onion, but it is just right!!
 
 
?

Monday, 8 June 2015

CARAMEL STICKY BUNS

If you have a sweet tooth, or if you want to really impress your breakfast guests (or potluck friends), this is the recipe for you. It is completely decadent and one of those recipes that you will find yourself going back to again and again.

 
BUNS
3 1/2 to 4 cups bread flour
1/2 cup sugar
1 teaspoon salt
2 envelopes dry yeast (I use 2 scant tablespoons)
1 cup very warm milk (not hot)
1/4 cup butter (room temperature)
1 egg

In the bowl of your stand mixer, mix 2 cups flour, 1/2 cup sugar, salt and yeast.  Add warm milk, soft butter and egg. Beat with electric mixer on low for one minute, scraping the sides of the bowl frequently, then beat on medium speed for another minute.

Add the rest of the flour (1/2 cup at a time), beating well in between each addition. The recipe calls for 3 1/2 to 4 cups of flour. I got a beautiful dough, easy to handle at 3 1/2 cups. Knead the dough by hand (or machine) for five minutes.

Grease (I use cooking spray) the bowl and put the dough back in. Cover loosely with plastic wrap and set in a warm spot for 1 1/2 hours or until dough is double in size.

While your dough is rising, make the filling and caramel topping.

FILLING
1/4 cup granulated sugar
1 teaspoon cinnamon
2 tablespoons butter (room temperature)
Mix the sugar and cinnamon and set aside the butter.

CARAMEL TOPPING
1 cup brown sugar (I use dark brown, but light brown is ok too)
1/2 cup butter (room temperature)
1/4 cup light corn syrup
1 cup pecans roughly chopped (optional)

Put the brown sugar and butter in a saucepan and bring it to a boil (stirring constantly). Remove mixture from heat immediately and stir in light corn syrup, set aside.

After dough has risen, turn out onto counter and pat all the air out of it. Gently roll into a 10x15 rectangle and spread with the reserved 2 tablespoons butter. Sprinkle with cinnamon sugar filling and roll up, starting with longest side. Pinch seam together and cut into 1" slices.

Pour the caramel topping into a 9 x 13 pan and sprinkle with pecans if you are using them. Top with sliced dough sections (not too close together). Cover loosely with plastic wrap and let it rise for 30 minutes. The dough will rise quite a bit, so don't crowd the slices. 

Bake in preheated 350� oven for 30 to 35 minutes (my electric oven took 28 minutes), or till golden.

Remove from oven and let sit in pan for 2 minutes. Turn over onto heat proof plate and DON'T REMOVE THE PAN FOR 3 MINUTES (this gives the caramel sauce time to drizzle back down over the buns).

Remove pan and serve warm.  Makes 15 rolls.
ENJOY !!!?

Sunday, 31 May 2015

EASIEST PEANUT BUTTER FUDGE EVER !!!

A friend shared this recipe with me and I can guarantee you that I will be making this fudge over and over, it is REALLY fast and easy, and it is SUPER yummy!!

 
2 cups white sugar
1/2 cup evaporated milk
1 teaspoon vanilla extract
3/4 cup (smooth) peanut butter

In a medium sized saucepan (with a heavy bottom), mix 2 cups sugar and 1/2 cup evaporated milk. The heavy bottomed saucepan will keep this mixture from scorching.

Cook on medium high heat, stirring, until bubbles start to form around the edge of the pan. Turn the heat down to medium low and cook until the mixture starts to boil (bubbles all across the surface that don't go away when you stir it). Boil for exactly 2 1/2 minutes, stirring constantly.

Remove from heat and stir in vanilla and peanut butter. Mix until very smooth (whisk works well here).

You can pour this cooked mixture into any size pan you like (larger pan gives you thinner fudge), but just make sure you have lined the pan with parchment paper or foil first. I had great luck using a loaf pan.

Sit this pan of hot fudge on a cooling rack. After about an hour or so, the fudge will be FIRM, but still very warm. This is the BEST time to cut the fudge cleanly.  Just grab onto the parchment paper or foil that you lined the pan with, and lift the whole thing out of the pan. Slice the fudge with a THIN, SHARP knife.

You can also wait and cut the fudge after its completely cool, but it cuts easier and more cleanly if you cut it while its still warm.

Store cooled fudge in airtight container.
 
ENJOY !!!

Wednesday, 27 May 2015

LEMON BLUEBERRY ZUCCHINI CAKE

This recipe is all over the Internet. So, when a friend asked me to make it for her family, I jumped right in. 

As written, I could see that the recipe might be a little heavy, so I made a couple very minor changes and it produced a wonderfully moist, tender and delicious cake.  I hope you'll try it, it's a breeze to make and our grandson labeled it "decadent"  (that's a good thing, I think? hahaha).


LEMON BLUEBERRY ZUCCHINI CAKE
2 cups finely shredded zucchini (squeezed dry)
1 pint fresh blueberries (I used about 2 cups)
3 eggs (I used room temperature eggs)
1 cup vegetable oil  (I use canola)
3 teaspoons vanilla extract
1 teaspoon lemon extract  (my addition)
2  1/4  cups white sugar
3 cups CAKE FLOUR  (recipe originally said AP flour)
1 teaspoon salt
1 teaspoon baking powder
1 teaspoon baking soda

Preheat oven to 350� and generously grease AND flour two 8" round cake pans (even if they are no stick).

Grate the zucchini (I used 2 small zucchini because they are very tender) and put then in a clean dish towel. Twist the towel closed around the zucchini and squeeze out the extra liquid (you will get quite a bit out), just keep twisting. Set aside.

Beat room temperature eggs, oil, vanilla extract, lemon extract and sugar together till well mixed. Fold in shredded zucchini by hand.

Sift the CAKE FLOUR (regular flour will work but it will give you a much heavier cake) into a large bowl, then gently dip in your measuring cup and level off the cup with a straight edge. Add 3 of these sifted cups of cake flour 1 cup at a time, mixing well in between each addition, but don't over mix.

Fold in the blueberries (save a few out for decoration).  Divide the batter in between the 2 prepared cake pans. Gently drop the pans on the counter to dislodge any possible air pockets.

Bake at 350� for 35-40 minutes. My electric oven took exactly 35 minutes. Test for doneness with the toothpick test.

Cool in cake pans for 20 minutes, then gently turn out of pan, onto a baking rack. Wrap the HOT cakes in plastic wrap and let cool completely.


When completely cool, unwrap the cakes and frost with lemon buttercream frosting and decorate with more blueberries.

Frosting
1 cup room temperature high quality butter (no substitutions)
3  1/2 cups powdered sugar
Juice of 1 lemon (2 tablespoons)
1 teaspoon lemon extract
1 teaspoon vanilla extract
1/8 teaspoon salt

Beat butter with electric mixer until smooth. Add everything else and beat on high till light and fluffy.


Monday, 11 May 2015

EASIEST NO-BAKE CAKE IN THE WORLD

The title, Easiest No-Bake Cake in the World, is not an exaggeration, that's for sure. It is also very impressive to serve, and EVERYONE wants the recipe. It's delicious, unique and SUPER EASY to make.


Before I give you the "recipe", let me just say that there really isn't a recipe. It's just homemade whipped cream, chocolate wafer cookies (chocolate graham crackers work too), and some decorations (nuts, candies, sprinkles, etc.). Then it sits in the fridge overnight. By the next day, the cookies (or graham crackers) will have softened, and they will taste just like cake !!

OK, here goes: The recipe calls for Nabisco chocolate wafer cookies, but some people have a hard time finding them (and they are expensive), that's why I'm suggesting CHOCOLATE graham crackers work equally as well (I think the chocolate graham crackers even taste better than these wafer cookies).

 
The recipe also calls for homemade whipping cream.  You can use Cool Whip if you have to, but it won't be as TASTY as homemade whipped cream:

3 cups heavy whipping cream
5 tablespoons sugar
2 teaspoons vanilla Extract

Beat these ingredients with an electric mixer (on high) until stiff peaks form, but don't over whip because it starts to taste like butter.

HINT: If you live in a hot climate, put your bowl and beaters in the freezer for 5 minutes (to cool them down) before making the whipped cream.

Now, it's time to assemble:  make 4 stacks of cookies (or chocolate graham crackers) 9 cookies high, putting some whipped cream in between each cookie, like this:


Next, lay the stacks on a serving plate next to each other (not end to end). They will want to smoosh around a little, but a very flat thin spatula will help you lift and maneuver each stack. It should look like this:

It's important to arrange them like this, so that when you serve this cake, you will be cutting ACROSS the cookies (the reason will be more obvious in the following photos.

Next cover the whole "cake" with a nice thick layer of whipped cream, like this:


Decorate (or don't decorate) the top of it with whatever you like: nuts, crushed candies, sprinkles, etc.

Cover lightly with plastic wrap and
chill overnight before you serve.
 
When it comes time to serve, cut the cake with a sharp, thin bladed, knife. It will slice through the softened cookies easily.
 
 
See why it's important to arrange the cookies cross wise, so when you cut it, you get this impressive design?
 
Store, covered, in the fridge and be prepared for recipe requests.
 
 
ENJOY !!!
?
?
?

Tuesday, 5 May 2015

HOT FUDGE SUNDAY CAKE FOR MOTHERS DAY

Click On This Photo For
The Full YUMMMMM-factor

 
The first time I saw this recipe, I knew I had to try it because it had a lot of things going for it. First and foremost, it is an ooey-gooey chocolate dream. Secondly, there are no mixing bowls (you mix it right in the baking pan). Thirdly, it does not require any special ingredients (not even butter or eggs). And finally, this super-tender chocolate cake bakes on top of a rich hot fudge sauce�need I say more?

3/4 cup all-purpose flour
2/3 cup white sugar
1/2 cup unsweetened baking cocoa
(divided)

1 1/2 teaspoons baking powder
1/2 teaspoon salt
1/2 cup milk
3 tablespoons vegetable oil
2/3 cup brown sugar (packed)
1 teaspoon vanilla extract
1 1/4 cups boiling water
1 1/2 teaspoons instant coffee granules
Vanilla ice cream


Preheat oven to 350�. In an (un-greased) 8�x8� baking pan, mix flour, white sugar, 1/4 cup of the cocoa, baking powder and salt (stir it up to combine); add the milk and oil and stir until the batter is well mixed.

.
Mix the brown sugar and 1/4 cup of cocoa together and sprinkle evenly over the batter (DO NOT MIX IT IN).
.
Combine the boiling water, vanilla and instant coffee and gently pour it over everything (DO NOT MIX IT IN).
.
Bake for 35 minutes (the hot fudge sauce will bubble up from underneath and around the edges of the cake as it bakes). Allow this to cool for 15 minutes before you serve it (just make sure it's very warm when you serve it).
.
To serve, top a slice of cake with scoop of vanilla ice cream and spoon the hot fudge sauce (from the bottom of the pan)over the ice cream.

.
As simple as this dessert is�it is just unique enough (and delicious enough) for company as well.

Wednesday, 29 April 2015

GRANNY's CREAM CHEESE POUND CAKE

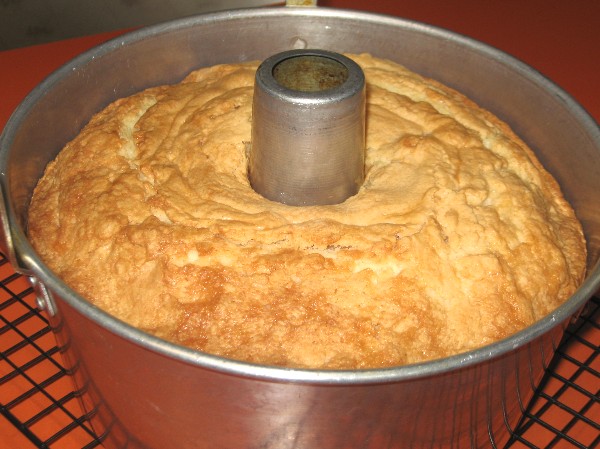
Don't let this unassuming photo deter you from this recipe. This is, by far, one of the best cakes we've ever had. It is everything you want in a pound cake... it is tender, it has a very fine crumb, it is sweet, rich and buttery. Whether you are slicing it up for the perfect strawberry shortcake or serving it with a big scoop of ice cream, this is the perfect cake ...even for the most picky guests!!
At our house, we seldom even frost this, we just snack on it till it's gone.......it is THAT good.


1 1/2 cups butter at room temperature (important)
8 ounces cream cheese at room temperature(important)
3 cups granulated sugar
6 large eggs at room temperature (important)
3 cups cake flour
1/8 teaspoon salt
2 teaspoons vanilla extract
1 teaspoon coconut extract

In a LARGE bowl, with electric mixer, beat the room temperature butter for about a minute.  Add the room temperature cream cheese and beat for two more minutes (it should look light and fluffy). It is very important that both of these ingredients are at room temperature.

Gradually sprinkle in the sugar (while your mixer is running) 1/2 cup at a time; beat well.  Add the eggs, one at a time, beating well after each egg. Mix in extracts.

Measure out 3 cups of CAKE FLOUR and 1/8 tsp. salt, then sift it all.  Add slowly to butter mixture, on low speed, mixing well after each addition.

Generously grease AND flour a 10" bundt pan (don't use cooking spray)   Bake in preheated 300 degree oven for 1 hour 40 minutes, or till toothpick tests clean.


Fairly nondescript looking, but don't let that sway you.  The genius of this recipe is in the taste. The combination of butter and cream cheese makes this cake to die for moist and rich.

Let the cake cool, in the pan, for 15 minutes before you turn it out, then cover it with plastic wrap, directly on the surface of the hot cake, until it is completely cool. Frost as desired.


NOTE:  Yes, 300 degree oven is correct.

NOTE: Don't be tempted to grease your pan with vegetable spray. Make sure you grease and flour your pan well (tap out excess flour).

NOTE: Make sure you sift the cake flour. I know it is a pain, but cake flour tends to clump more than all purpose flour, so this step is important. You CAN make this cake with all purpose flour, but you won't get that very fine crumb that is so delicious.

ENJOY !!!?

Wednesday, 22 April 2015

CHOCOLATE LOVERS CHOCOLATE PUDDING

If you love chocolate, as much as I love chocolate, I hope you will try this recipe. I have been perfecting it for a couple of years now, and the process has required a lot of delicious taste testing sacrifice on my part, but the end result is perfection: thick, ultra-chocolate-y, super rich and addicting....just right!!


2 1/4 cups milk (I use 2% milk, but any kind is ok)
1/2 cup whipping cream
1/2 cup brown sugar (I use dark, but light is ok)
3 egg YOLKS  (yolks ONLY)
3 tablespoons corn starch (very slightly rounded)(not heaping)
1 (11.5 ounce) bag milk chocolate chips
3 tablespoons butter (cut into pieces)
1 teaspoon vanilla

Whisk the brown sugar and corn starch together and set aside. This step isn't absolutely necessary, but if you do it this way, the cornstarch will not clump up or lump up when you add the milk. 

Whisk the cream, milk and yolks together in a saucepan that has a nice heavy bottom (it prevents scorching). Add the dry mixture to the wet mixture and whisk until smooth. Make sure you scrape the corners of the pan because the corn starch likes to "hide" there.

Cook on medium heat (stirring) until it gets thick and starts to bubble all over the entire surface of the pudding. TURN THE HEAT DOWN to a level where it still bubbles (but isn't going crazy) and cook/stir for another 30 seconds.

Remove from heat and add the butter, milk chocolate chips and vanilla; whisk until melted and smooth.
 
Now, if you REALLY want that super smooth and silky mouth feel, pour the cooked pudding through a mesh strainer, it REALLY makes a HUGE difference but isn't absolutely necessary.


Pour into dessert dishes and lay a piece of waxed paper or plastic wrap right on the surface of the hot pudding (this will stop any "pudding skin" from forming). Chill for at least 4 hours. Top with whipped cream and serve cold.
 
A NOTE ABOUT CHOCOLATE CHIPS: Any brand milk chocolate chips will work. I usually use Nestl�'s or Ghirardelli chocolate chips and try to stay away from the waxy generic house brands of chocolate chips. But that's just my preference.

ENJOY !!

Tuesday, 14 April 2015

ALMOND JOY BITES

This candy treat is very quick and easy to make and it tastes VERY much like an Almond Joy candy bar (only I think they are even better).

Just a few ingredients and no baking makes this recipe a real winner and they look so pretty. Great for gift giving or just for snacking.


1 1/2 cups shredded sweetened coconut
8 tablespoons sweetened condensed milk (NOT evaporated)
1/2 teaspoon vanilla extract
1/2 teaspoon almond extract

12 ounce bag of milk chocolate chips (see note)
1/4 cup toasted almonds (optional)(see note)

Put the coconut, sweetened condensed milk and extracts in the food processor and pulse until the mixture is finely chopped and thick and sticky.

Put 24 mini cupcake papers into a mini cupcake pan and set aside.

Melt the chocolate chips  (until smooth)in the microwave, on 30 second blasts (stirring well after each 30 seconds). My microwave took a total of about 75 seconds, or 2 1/2 blasts).

Spoon about 1 teaspoon melted chocolate onto the bottom of each mini cupcake paper and smooth it around a little.

Next, (using slightly damp hands) roll the coconut mixture into balls about the size of a small grape and  sit it on top of the melted chocolate later. Flatten ball (just a little) with you finger.

Top coconut ball with about 2 teaspoons melted chocolate. That's it!! 

Set the candy in the fridge for about 10 minutes to "set" the chocolate. It couldn't be easier!!!  Makes 24 candies.

NOTE: Any flavor chocolate chips will work. We like milk chocolate, but semi-sweet or dark would work well too.

NOTE: I don't put nuts in this candy, but if you want them, go for it. A whole toasted almond on top of the coconut layer works well.

NOTE: I keep these in the fridge, although it's not necessary. It just depends on how hot it is where you live.

ENJOY !!!?

Monday, 6 April 2015

KID FRIENDLY SLOPPY JOES

Years ago, when our hungry teenage boys came home for dinner (with hungry friends tagging along) it was a challenge to feed them all with one pan of Sloppy Joe's. Unexpected "guests" at the dinner table were fun, but required some quick thinking, so I "stretched" this simple but tried and true recipe, by adding kidney beans, extra shredded veggies and cheese. It was always a big hit. Necessity is the mother of invention I guess, thank goodness for versatile recipes like this one.


 These days, with the kids all gone, I still make full size batches of Sloppy Joes but I freeze the extra in quart freezer bags. I put the leftover meat into the bag, removing as much of the air as possible, then patting the meat into a 1" thick flat shape before freezing it (this thin "disk" of Sloppy Joe filling thaws out quickly). I love "instant" meals like this. 

1 pound lean ground beef (I use 90% lean)
1/2 cup chopped onion
1/3 cup chopped celery
1/2 cup chopped bell pepper
1 cup shredded carrot
2/3 cup ketchup
1/2 cup water
2 tablespoons Worcestershire sauce

1/8 (to)1/4 teaspoon cayenne pepper (see note)
1 teaspoon salt
1/4 teaspoon black pepper
5 hamburger buns, split and toasted

Cook the hamburger and vegetables together until meat is no longer pink (chopping up the meat as it cooks) (drain meat well).

Stir in remaining ingredients (except buns). Simmer on med-low for about 20 minutes (to reduce the consistency of the sauce, but don't let it get too dry). Fill the hamburger buns with the beef mixture and serve.


NOTE: After this is cooked, it keeps well in the crockpot (on low) if your dinner hour is uncertain.

NOTE: I serve these with a slice of cheese under the meat mixture and a squirt of yellow mustard on top of the filling (our favorite).

NOTE: I make this with an 1/8 teaspoon of cayenne because picky-picky husband is VERY SHY when it comes to heat/spice in his food. If you like a little more spark in your sandwich, use 1/4 teaspoon.


ENJOY !!!?