Pages

Thursday, 24 August 2017

EASY CROCKPOT PICNIC BEANS

I've been making these beans for my family for 30+ years and they are always a hit. Now that we are empty nesters, I make a big pot of these and then freeze them in 2 cup containers for a quick and yummy addition to any meal. 


I put the following ingredients (which are always in my pantry) into the crockpot before I go to bed and let them cook on LOW all night.


2 cups DRY navy beans (do not soak)
6 cups water
1/2 cup dark brown sugar  (light brown sugar works well too)
3 teaspoons salt
1/2 teaspoon pepper
1 teaspoon dry mustard powder
3/4 cup sweet onion chopped small *see note below
(1) 8 ounce can tomato sauce
6 slices crisp cooked bacon

Now, a word about the beans:  Over the years, I've tried every kind of DRY bean there is and they ALL work, however, the tiny little "navy beans" work the best and tolerate re-heating without going mushy. I highly recommend that you use navy beans.

Saute onions and fry bacon until almost crisp then drain well. Put everything into a large crockpot and cover with 6 cups of water. Stir well and set on low for 12 hours. 

At the end of 12 hours, if it seems like there is too much liquid in the beans, you can prop a spoon under one side of the crockpot lid and let the sauce cook down for a couple hours. I seldom have to do this, but it HAS happened with certain types of beans.

Note about onions: When I decide to make these beans and I'm out of fresh onions, I use a scant tablespoon of dehydrated onion flakes, they work well.

ENJOY !!!

Friday, 18 August 2017

APPLE SNACK CAKE with CARAMEL FROSTING

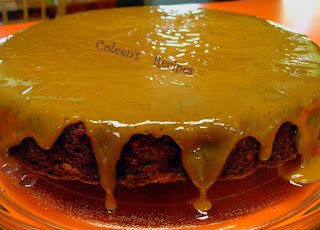
This is a super easy, single layer (stir and bake) snack cake. It is VERY moist (even after 3 days) and truly delicious (we can't seem to stop snacking on it!!) This cake (and frosting) freezes exceptionally well when double wrapped in the freezer.


The frosting in this photo is still
hot, so it looks a little strange, but
as it cools, the frosting turns into a very
SOFT fudge-y consistency...delicious !!!

APPLE SNACK CAKE
1/2 cup vegetable oil
1 cup sugar
2 eggs
1  1/2 cups all purpose flour
3/4 teaspoon baking soda
1 teaspoon vanilla
1/2 cup chopped pecans
1 1/2 cups chopped Red Delicious apples 
1/4 teaspoon cinnamon

Mix the oil, sugar, eggs, cinnamon and vanilla. Stir in the flour and baking soda.

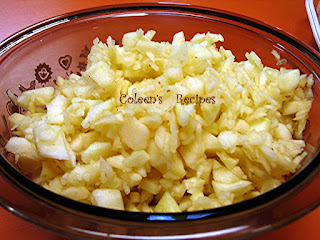
Peel and chop the apples fairly small (I use my food processor)

Red Delicious apples

Stir in the apples and nuts until well mixed. 

Spray a 9" cake pan with cooking spray AND line the bottom with parchment paper, then spray it again. If you do this, the baked cake will pop right out of the pan.

Bake in a preheated 350� oven for 35-40 minutes (test for done-ness with toothpick). My electric oven takes exactly 35 minutes.

Let the baked cake sit IN pan for 20 minutes before you turn it out.
Cool the cake completely, then frost.


CARAMEL FROSTING
5 tablespoons butter
1 cup light brown sugar (packed)
1/3 cup evaporated milk*
1/2 teaspoon vanilla

In a small saucepan, melt the butter and add the brown sugar and evaporated milk. Bring to a boil, then turn heat down so that it boils softly for 1 minute, whisking the whole time.

Remove from heat (add the vanilla) and keep whisking until it starts to thicken up just a little (you can do this step with your electric hand mixer if you want). 

Keep in mind, that as the frosting cools, it will thicken even more. Let cake and frosting cool completely before cutting the cake.

NOTE: If you don't have evaporated milk, I would think that whipping cream would work just as well (but I haven't tried it that way).

ENJOY !!!

Sunday, 13 August 2017

LIGHT AS AIR PEANUT BUTTER PIE

Most peanut butter recipes like this are way to "heavy" and way to sweet, but this one is PERFECT, it's more like a light mousse. 

Double the ingredients and put it in a 9x13 dish and it will disappear from ANY buffet table in a wink, followed by lots of requests for the recipe. IT IS LIGHT AS AIR !!!!!


9" Pie or double the ingredients and
make a 9" x 13" size for a crowd 


CRUST
2 cups graham cracker crumbs
1/4 cup sugar
1/4 cup melted butter

Combine all crust ingredients and press into a 9" pie pan (pushing up the sides) sit it in the fridge while you are making the filling.

FILLING
8 ounce package of cream cheese, room temperature
1 cup creamy peanut butter  (I use Jiff)
1 cup sugar
1 tablespoons soft butter
1 teaspoons vanilla
1 cup whipping cream

Beat the cream cheese until it is smooth, then add the peanut butter, sugar, butter and vanilla.  Beat on high until the mixture is very well mixed and smooth.

In a separate bowl, whip the cream until you get stiff peaks, then gently fold it into the peanut butter mixture by hand, making sure that it is well mixed and you don't see any streaks of white.

Spoon filling into the crumb crust. Chill the whole thing for 3-4 hours or overnight.

NOTE: For the chocolate decoration on this pie, I heat 1/4 cup of milk to boiling, then pour it over 1/2 cup of chocolate chips. Stir until well melted and smooth. drizzle over the finished pie and then sprinkle with a few graham cracker crumbs and chopped peanuts for decoration....(not  necessary, but fun).

NOTE: OK......here's a warning.... if you are like me and you like to lick the beaters and spoons, you will notice sugar grains in the filling.....don't freak out. After it chills in the fridge for a couple of hours, they will totally disappear and the filling will be SILKY SMOOTH!! I promise!!!


This stuff is totally addicting!!

ENJOY !!!
?

Tuesday, 1 August 2017

BREAD and BUTTER ZUCCHINI PICKLE RELISH


This time of year, there is an abundance of fresh zucchini to make Bread and Butter pickle relish out of it. It is absolutely delicious and we use it in everything from tuna fish, to potato salad, to hot dogs, you name it.........NO ONE has EVER guessed it is made of zucchini, it just tastes like the BEST bread and butter pickles.


12 cups unpeeled zucchini (chopped small)
3 cups sweet onion (chopped small)
1 cup celery (chopped small)
2 large red bell peppers (chopped small)
2 cups peeled carrots (chopped small)
1 cup pickling salt (see important note)
3 cups white vinegar
3 cups granulated sugar
2 teaspoons turmeric
2 teaspoons DRY mustard powder
1 tablespoon celery seed
1/2 teaspoon black pepper
1 tablespoon corn starch


Wash and dry the vegetables before cutting them (the only one you should peel is the carrot).  Coarsely chop the vegetables, then put them in the food processor (2 or 3 cups at a time) and pulse them a few times to get them small enough for a good relish (but not too small). The chop size should look like the next photo.

Measure the vegetables AFTER you chop them in the food processor.

Mix the small chopped vegetables and 1 cup of pickling salt. Place this mixture (covered) in fridge overnight (The salt will draw excess moisture out of the veggies).


IMPORTANT NOTE: After the vegetables have chilled overnight, it is VERY IMPORTANT that you rinse the salt off of them. I rinse the chopped veggies three times (in small batches).


Whatever method you choose to rinse the salt off, just make sure you rinse, rinse, rinse then squeeze as much water out of the chopped veggies as you can(I use my salad spinner). Set aside.

In a large, non-aluminum, pot, mix the vinegar, sugar, celery seed, spices and corn starch. Bring to a boil (to dissolve the sugar). Add all of the rinsed vegetables to the pot and bring BACK to a boil. Once it is boiling well, turn heat to medium low and gently boil everything for 20 minutes, stirring every five minutes or so.

While the relish is simmering, sterilize 7 pint jars and 7 (two piece) screw on lids. I do this by putting the jars through a hot cycle in my dishwasher (but I don't put the lids in there). Keep the jars in the (unopened) hot dishwasher after the last cycle.


For the lids, I just wash them with hot soapy water, rinse them well and then pour boiling water over them in a large saucepan which I keep warm on a burner.


Also, while the relish is simmering, bring your  hot water bath to a boil, here's how: Place a rack on the bottom of a large stock pot (or something to keep the jars up off of the bottom of the pan) and fill the pot with water (water should be deep enough to cover the jars by 2". Bring to full boil.

Now that your relish has boiled for 20 minutes, remove it from the heat and place it in the hot jars, leaving 1/4" space at the top of the jars (make sure there are no air pockets in the relish). Wipe the rims of the jars with a clean, hot, wet kitchen towel and screw on the two-piece lids fairly tight. Lower the jars into the already boiling water and keep them in there  10 minutes for half pint jars and 15 minutes for pint jars.


Remove from boiling water and let cool to room temperature on your kitchen counter. As they cool on your counter, you will hear the lids "pop" when they make the correct seal.  If they don't "pop", just keep them in the fridge.


NOTE: Do not use regular table salt for this recipe because the anti-caking agents in table salt cause the relish to discolor.  If you d?on't have pickling salt, the next best thing to use is kosher salt (but I highly recommend pickling salt).

NOTE: The recipe calls for 12 cups of chopped up zucchini. I have found that if I am a cup short of zucchini, I just add an extra cup of chopped carrots. Works well.

NOTE: This recipe makes 7 pints of relish.


ENJOY !!!