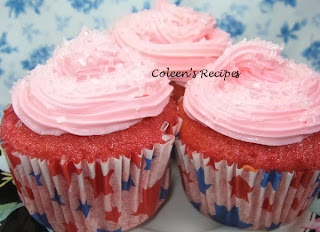
Basically it is just a DRY cake mix + a 20 ounce can of fruit pie filling + 3 large eggs mixed together (DO NOT follow cake mix instructions on the box). It makes an extremely moist and flavorful cupcake and it couldn't be easier !!
You can use ANY flavor dry cake mix and ANY flavor canned fruit pie filling so the combinations are endless. Our favorite is chocolate with cherry pie filling but we've also thoroughly enjoyed chocolate cake with raspberry pie filling, strawberry cake with strawberry pie filling, spice cake with peach pie filling, and yellow cake mix with lemon pie filling (*see note below about white cakes).
STRAWBERRY CUPCAKES
(1) box dry cake mix (usually about 20 ounces?)
(1) can pre-prepared pie (fruit) filling (usually about 20 ounces?)
(3) large eggs
For the cupcakes posted today, I combined a box of Betty Crocker strawberry cake mix (ignore any directions on the box) plus a 20 ounce can of Wilderness strawberry pie filling plus three large eggs. Put everything in your mixing bowl and beat on medium-high speed for about 2 minutes (batter will be a little thicker than you expect). Fill paper lined cupcake pans about 2/3 full and bake at 350� for 20 minutes (or till toothpick tests clean). That's it !!!
NOTE: Don't worry about the "chunks" of fruit in the pie filling. When you mix it into the cake mix with your electric mixer, the fruit will break up (which is what you want).
NOTE: *This recipe is not suited for white cake mixes for some reason. They taste good, but have a strange color after they are baked.
NOTE: The weight on most cans of pre-prepared pie filling is different...some cans are 18 ounces some are 20 ounces. This measurement doesn't seem to be crucial. Just get the size can closest to 20 ounces that you can find.
NOTE: This recipe works very well for sheet cakes, as well as layer cakes. Just use the toothpick test for doneness instead of the baking times on the cake mix box.
NOTE: After you remove the cake from the pan, cover the HOT cake tightly with plastic wrap and let it cool. Keep covered until you frost the cake. I do this step with ALL of my cakes. It makes a huge difference.
Buttercream Frosting
1 cup of UNSALTED butter (room temperature)
1 teaspoon vanilla extract
1 teaspoon almond extract
4 cups powdered sugar
1/4 cup milk
food coloring (optional)
Cream the butter with an electric mixer until it gets fluffy. Add everything else and beat on medium speed until everything is well mixed, then beat on high speed until it is smooth and fluffy.
NOTE: These cupcakes are topped with Wilton's sparkle sprinkles (clear).


